HOW TO: JDownloader Linux Terminal + Web Interface + Console + VNC Server + x11HOW TO: JDownloader Linux Terminal + Webinterface + Console + VNC Server + x11
Me encontré con la necesidad de tener un JDownloader en un Server Linux donde la interfaz es todo por línea de comando (SSH).
Me entere que el JDownloader trae una interfaz web, así que pensé que estaba todo solucionado.
Pero la interfaz web tiene tres defectos:
- Necesita un servidor X para funcionar correctamente. (No X11 DISPLAY variable was set, but this program performed an operation which requires it.)
- No se pueden resolver captchas desde la misma.
- Las operaciones posibles son muy limitadas.
Por suerte, me encontré con que la solución al primer problema, el más vital, soluciona los tres.
La respuesta es un servidor vnc (vncserver). Este servidor nos permite crear un servidor x, donde correrá la GUI (Graphical User Interface), y así mismo, nos permitiría la posibilidad de ver esta GUI (conectándose desde un visor), y así resolver captchas y tener acceso total al JDownloader. A su vez, seguimos prescindiendo de tener un servidor X corriendo en el servidor, el cual preferentemente esta sin monitor, ni teclado.
El proceso de instalación que voy a mostrar, es con Debian Linux (en Ubuntu debería ser lo mismo), debería similar en otras distros (Nota: De NO poseer sudo, esos comandos deben ser ejecutados como root, sin anteponer sudo - Por defecto Debian no trae sudo):Instalar vncserver:
sudo apt-get install vnc4server, para descargar el servidor vnc.
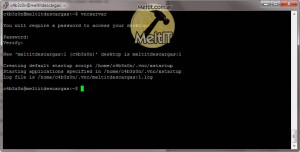
vncserver, para iniciar el servidor vnc. En el primer inicio solicitara una contraseña y su verificación. Esta es para conectarse con el visor. Luego de esto, a mi me mostró una línea como “New ‘meltitdescargas:1 (c4b3z0n)’ desktop is meltitdescargas:1”, indicando que el servidor esta corriendo en :1, siendo ‘meltitdescargas’ el nombre de mi sistema.
Si se pone vncserver nuevamente, se iniciara otra instancia, en el siguiente lugar, :2, :3, etc.
Para matar el servidor, se puede matar el proceso, o invocando vncserver -kill :numero, en mi caso sería vncserver -kill :1.
Una vez que tenemos el servidor vnc corriendo, lo único que falta es usarlo como DISPLAY. Esta variable lo que hace, es indicar cual es el servidor X.
Para cambiar su valor, debemos utilizar export. La sintaxis es simple, export DISPLAY=servidor:numero. Cuando iniciamos el servidor, obtenemos el número, y el nombre. Al ser el mismo equipo, podemos utilizar localhost:1, ó también se puede utilizar la ip, ej: 10.0.0.201:1. En mi caso voy a utilizar localhost, export DISPLAY=localhost:1.
Nota: Para resetear la contraseña del vncserver, tan simple como rm ~/.vnc/passwd.
Con esto ya terminamos la preparación necesaria para el JDownloader por parte del servidor x.
Instalar Java:
El siguiente paso es instalar el JRE, Java Runtime Environment, necesario para correr JDownloader. Yo voy a optar por utilizar openjdk, ya que viene en los repositorios por defecto en Debian. El Java de Sun, esta en los repositorios non-free, y hay que agregarlos manualmente. apt-get install openjdk-6-jre.
Con esto están finalizados los preparativos.
Descargando JDownloader:
En la web del JDownloader hay un script, jd.sh, para automatizar el proceso de instalación y actualización del JDownloader. Personalmente, no me funciono. Así que voy a demostrar la instalación desde el .zip.
Una vez descargado, se necesita unzip para descomprimir, apt-get install unzip. Para descomprimir, simple como unzip fichero. En este caso, unzip JDownloader.zip. Se creara una carpeta, JDownloader.
Personalmente, opte por cambiar el directorio de JDownloader, a .jd. (Nota: Los archivos que comienzan en . son archivos ocultos). Es indiferente, lo que logro es esconder la carpeta de la instalación, ya que realmente no tengo que tener acceso a ella. Para hacer esto, mv JDownloader .jd . (mv es move, la sintaxis es mv fichero destino, en la practica tiene el mismo efecto que renombrar el mover).
Iniciando VNC Viewer:
Para el primer inicio, voy a demostrar como iniciar y ver el GUI.
Desde Windows, utilizare el VNC Viewer de Real VNC, versión ejecutable sin instalador.
Al abrirlo, pide por el servidor. Tenemos que ingresar la IP del servidor, con el display IP:X, donde X, es el número que devolvió el servidor vnc al iniciarse.
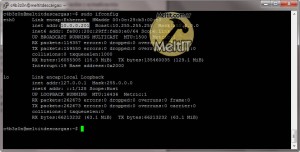
Para averiguar la IP del servidor, utilizamos sudo ifconfig. Probablemente, en eth0 - inet addr:xxx.xxx.xxx.xxx este la información.
Nuevamente en la ventana del VNC Viewer, indicamos IP:X, en mi caso, 10.0.0.201:1. Luego de "OK", pedirá la contraseña que se especifico al iniciar por primera vez el servidor.
Iniciando JDownloader:
(para unicamente iniciar el JDownloader, en caso de no estar desde consola, o en el visor del servidor VNC, la línea es java -Xmx512m -jar JDownloader.jar &, estando en el directorio donde se encuentra el JDownloader.jar, y el & para ejecutar en segundo plano)
Cree un pequeño script para iniciar el JDownloader, desde la consola o mismo desde el servidor vnc. Tener en cuenta que crea un vncserver . Lo único que hay que configurar es el directorio de instalación del JDownloader (opcional, modificar el numero DISPLAY destino). Funciona así:
1) No existe nombre_equipo:1.pid en ~.vnc/ ?
-> Entonces iniciar vncserver.
(Version vieja)
1) Iniciar un vncserver :X.
2) Asignar variable DISPLAY.
3) Iniciar jdownloader.jar (java -Xmx512m -jar $JDDIR/JDownloader.jar ) [como especificado en la web de JDownloader]
Para instalar el script, hay que descargarlo, y se puede poner en cualquier directorio (tanto como ~/). Nada más hace falta configurar el JDDIR (directorio de instalación de JDownloader). Luego, hay que darle permisos de ejecución al script, chmod +x startjd.sh. Y para iniciarlo es simplemente ./startjd.sh (Hay que anteponer el . para ejecutar en bash).
Script (descarga):
#!/bin/bash

#Version 0.2 - MeltIT.com.ar
#Changelog
# 0.2: Cambiado el sistema de inicio del servidor VNC. Es posible cambiar una variable para elegir donde manejar el servidor. A su vez, esta forma garantiza que el servidor vnc se inicie en tal posición.
# 0.1: Primera version.

#Directorio de instalion de JDownloader
JDDIR=~/.jd
#DISPLAY numero que se creara y ejecutara en.
VNCSERVER_NUMBER=1

#Chequeamos si hay un proceso para vnc en display :1
#if [ ! -e ~/.vnc/`uname -n`:1.pid ]; then vncserver; fi #version vieja

#version nueva:
vncserver :$VNCSERVER_NUMBER

#Asignamos DISPLAY en :X
export DISPLAY=localhost:$VNCSERVER_NUMBER

#Iniciamos JDownloader en segundo plano
java -Xmx512m -jar $JDDIR/JDownloader.jar &
Resumiendo el proceso:
1) Abrir el VNC Viewer y conectarlo.
2) ./startjd.sh
3) Comenzara el asistente de primer inicio.
Primer inicio y configuración de JDownloader:
En primera instancia, se selecciona el Idioma y el directorio de Descarga, es indiferente lo que se elija. (/home/c4b3z0n/descargasjd en mi caso).
Luego pregunta de la instalación de FlashGot, yo cancele ya que no utilizo el servidor para navegar por internet.
Luego de iniciado el programa, comenzara a buscar actualizaciones.
Vamos a proceder a la configuración:
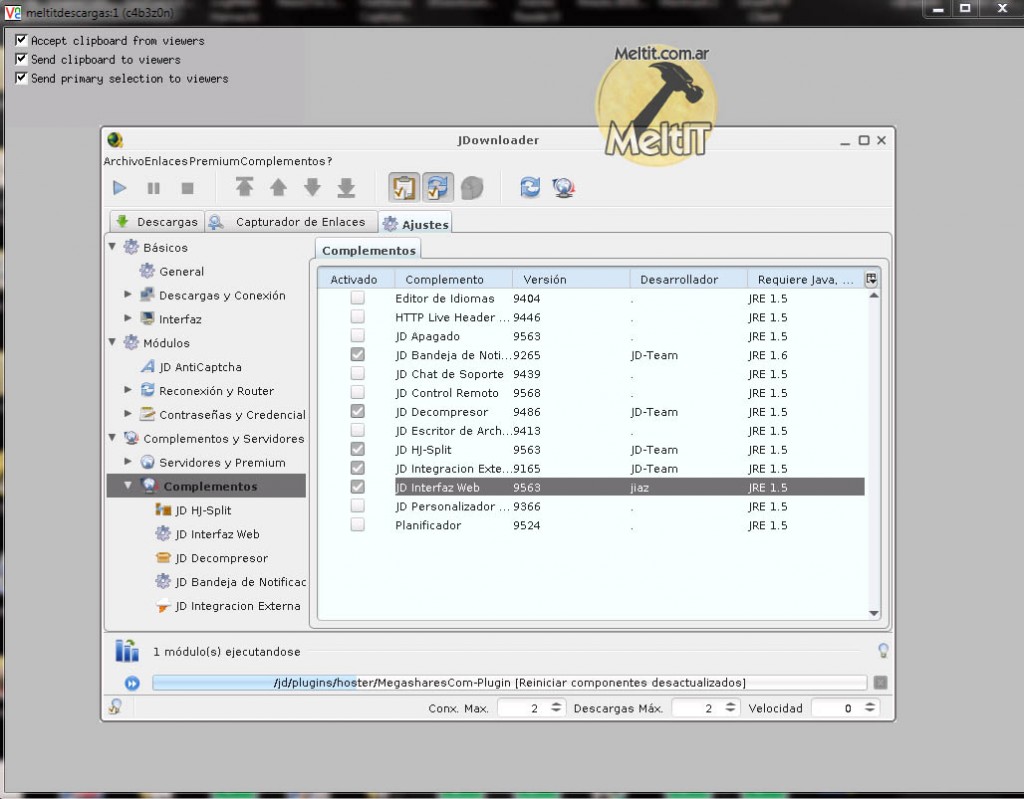
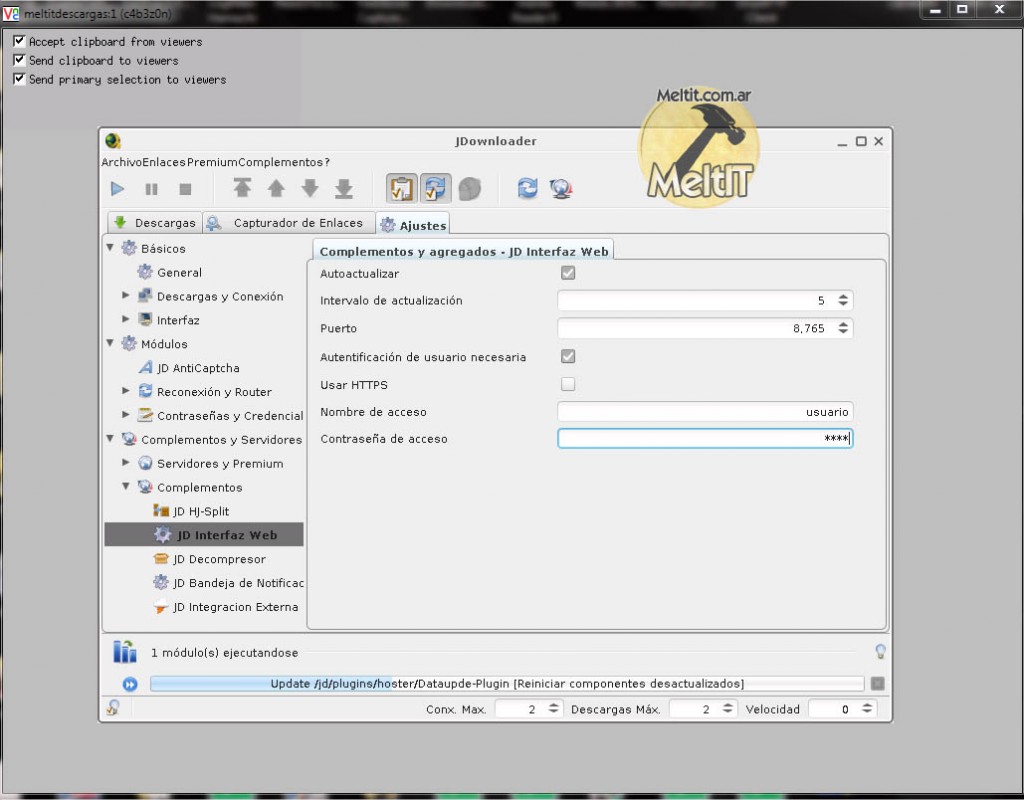
Solapa "Ajustes" -> "Complementos". Buscamos en la lista "JD Interfaz Web" (JD Web Interface).
Sobre la izquierda, bajo complementos, ahora aparecerá un nuevo item, "JD Interfaz Web". Las opciones configurables son:
Auto-actualizar: Esta opción sirve para cuando estemos en el navegador en la interfaz web, automáticamente se actualice cada X segundos la página.
Intervalo de actualización: En segundos, acá se ajusta el valor del auto-actualizar de la opción anterior. Por defecto es 5, esta bien.
Puerto: Puerto para acceder a la interfaz web, por defecto es 8765. No debería haber problema con este.
Autentificación de usuario necesaria: Acá se selecciona si se desea que se pregunte usuario y contraseña para acceder a la interfaz web. Por defecto activado. Si se va a utilizar en una red local, no debería haber problema con desactivarlo.
Usar HTTPS: Para usar HTTPS, por defecto desactivado. Desconozco detalles de utilización, así que lo dejo como viene.
Nombre de acceso: Usuario para el acceso en caso de pedir identificación para el usuario.
Contraseña de acceso: Contraseña para el acceso a la interfaz web.
Nota: Note que hay que reiniciar el programa para que hagan efecto los cambios de usuario y contraseña, Archivo -> Reiniciar. Es posible que para otros cambios también haga falta reiniciar el JDownloader.
JDownloader funcionando!
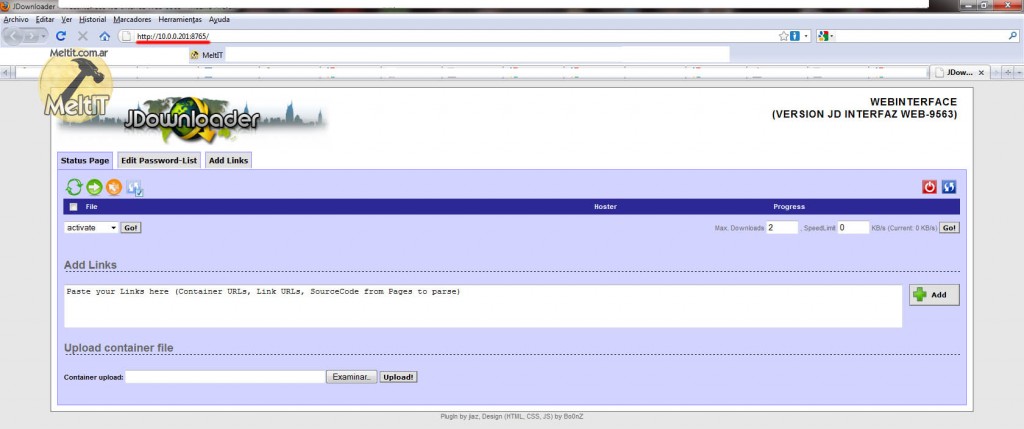
Ya no queda más que hacer. Para acceder a la interfaz web, basta con utilizar http://ip:puerto/. En mi caso es http://10.0.0.201:8765/. Si esta puesto para solicitar contraseña, aparecerá un cartel de Usuario y Contraseña.
En caso de requerir de ajustar alguna configuración, no hay más que entrar por el VNC Viewer. Mismo en el caso de que aparezca que necesita completar un captcha.
En si el script resume el inicio del vncserver y el jdownloader, así que basta con iniciar este y luego conectar el visor.While setting up a Linux server (SSH controlled), I've found out that I needed JDownloader to run in it.
I found on internet, that JDownloader has a web interface, so I've thought that it would solve my problems.
But the web interface has three problems:
- Although it run's without and x server, it needs one for correct working. (No X11 DISPLAY variable was set, but this program performed an operation which requires it.)
- Captchas cannot be solved from the web interface.
- It has limited options.
The solution to the first problem, it was the solution to all of them.
The answer is a vnc server (vncserver). This server allow's us to create an x server, where the GUI (Graphical User Interface) would run, and also allowing us to see this GUI (connecting from a viewer), and then be able to solve captchas and have full access to JDownloader.
The process that i'm going to show, is with Debian Linux (Ubuntu should be the same), it should be similar in other distributions (Note: If you DON'T have sudo, that commands must be run as root, without sudo - by default, Debian doesn't have sudo):Installing vncserver:
sudo apt-get install vnc4server, to install the vncserver.
vncserver, to start the vncserver. In the first start, it would request for a password. This would be used later for connecting through the viewer. After this, it showed to me something like: “New ‘meltitdescargas:1 (c4b3z0n)’ desktop is meltitdescargas:1”, showing up that the server is running at :1, being ‘meltitdescargas’ the network node hostname of my system (uname -n).
If you run vncserver again, it would run a new instance, in the next available location, :2, :3, etc.
To kill the server, you can kill the process, or try vncserver -kill :number, in my case, it would be vncserver -kill :1.
Once we have the vncserver running, the next thing is to set it up as the DISPLAY. This is a system variable, it points to a X server.
To change it's value, we must use export. the syntax is easy, export VARIABLE=value, in this case, we have to modify DISPLAY, so it would be, export DISPLAY=server:number. When we start the server (by running vncserver), we obtain the number, and the name.
As it is the same machine we're working on, we could use localhost:1, or you can use the IP, i.e.: 10.0.0.201:1. In my case, I will use localhost, export DISPLAY=localhost:1.
Note: To reset the vncserver password, you just have to do rm ~/.vnc/passwd.
With this, the x server preparation for the JDownloader is ready.
Installing Java:
The next step, is to install the JRE, Java Runtime Environment, which JDownloader needs to run. I'm going to use openjdk, as it comes in Debian's default repositories. Sun's Java, is on the non-free repositories, and they must be added manually. apt-get install openjdk-6-jre.
This is the last thing you have to do to prepare the system.
Downloading JDownloader:
On the web of JDownloader there's a script, jd.sh, that automatizes the installation and actualization process of JDownloader. For me, it didn't work. So I'm showing the installation from the .zip.
Once downloaded, you need unzip to decompress the file, apt-get install unzip. To decompress, it's easy as unzip file. In this case, unzip JDownloader.zip. A folder would be created, JDownloader.
Personally, I've chosen to change JDownloader directory, to .jd. (Note: Files/folders starting with a . are hidden files). It changes nothing, what I'm accomplishing with this is to hide the installation folder, because i'm not going to access it. To do this, mv JDownloader .jd . (mv is move, the syntax is mv file target, in practice, moving a single file/folder, renames it).
Initiating VNC Viewer:
For the first start, i'm showing how to initiate and see the GUI.
From Windows, I'll be using VNC Viewer from Real VNC, runnable version, without installation.
The first thing it requests, it's the IP:DISPLAY of the server. The server display must be entered like IP:X, where X, is the number vncserver showed up when it started.
To find out the server IP, we use sudo ifconfig. Probably in eth0 - inet addr:xxx.xxx.xxx.xxx it would be your IP..
Back in the VNC Viewer, you have to enter IP:X, in my case, 10.0.0.201:1. After "OK", it would request the password we entered when we first set up the vncserver.
Initiating JDownloader:
I've created a simple script for initiating JDownloader. Only thing it has to configure, is the JDownloader installation path. Here's how it works:
1) does not exists machine_name :1.pid in ~.vnc/ ?
-> Then, start vncserver.
2) export DISPLAY variable.
3) Start jdownloader.jar (java -Xmx512m -jar $JDDIR/JDownloader.jar ) [As it appears in JDownloader web]
To install the script, you have to download it, or create the file, and you can put it where you want. It only needs to configure the JDDIR (Installation directory of JDownloader) variable. Then, you must give execution permission to the file, chmod +x startjd.sh. And to run it, just ./startjd.sh (you have to put a . before the name of the file, to execute it in bash).
Script (download):
#!/bin/bash

#Version 0.1 - MeltIT.com.ar

#Installation dir of JDownloader
JDDIR=~/.jd

#We check if there's a process for VNC in :1
if [ ! -e ~/.vnc/`uname -n`:1.pid ]; then vncserver; fi

# we give DISPLAY a value
export DISPLAY=localhost:1

#Initiate JDownloader in background
java -Xmx512m -jar $JDDIR/JDownloader.jar &
Steps for first start:
1) Open VNC viewer and connect. (openning can be done at any moment on other starts, because the first start wizard won't show up)
2) ./startjd.sh
3) First start wizard will start.
First start and configuration of JDownloader:
On the first step, we chose language and download directory. (/home/c4b3z0n/descargasjd in my case).
Then it asks about installing FlashGot, I've canceled it, cause I'm not using the machine to navigate through the web.
After the software is running, it will look for updates.
Configuration:
Tab "Settings" -> "Extensions". We search in the list "JD Webinterface".
On the left, in extensions, now it should be, "JD Webinterface". the available options are:
Autorefresh: This option is to enable autorefreshing the page while you're in the web interface page, each X seconds.
Refresh Interval: In seconds, here you adjust the previous option value. By default 5, it's ok.
Port: Port for accessing the web interface, by default 8765. It shouldn't be any problem with this.
Need user authentication: Here you enable if you would like to ask for username and password for the web interface. By default, it's on. If it's going to be for private LAN usage, it shouldn't be any problem for disabling it.
Use secure socket (HTTPS): For using HTTPS, by default it's not enabled. I don't know if it has to have any additional configuration, so I'm not using it.
Login Name: Username for authentication.
Login Password: Password for authentication
Note: I've found out that for username and password settings to apply, you have to restart the program, File -> Restart. It's possible that for other changes it needs to restart also.
JDownloader working!
No more to do. To view the web interface, http://ip:puerto/. In my case, it's http://10.0.0.201:8765/. If ask for password is on, a dialog will show up.
To adjust any configuration, you only have to enter by the VNC Viewer. Also if you need to enter a captcha.
The script initiates the vnc server and JDownloader, if you need to change something, just login with the viewer, else you can controll downloads with the web interface.
HOW-TO: iPhone + Arch Linux Bluetooth Tethering
Ante la necesidad de tener internet en mi netbook, investigue como realizar tethering con el iPhone y Arch Linux.
Como base, encontre un articulo de como hacerlo en Ubuntu: Tethering iPhone 3.0 to Ubuntu 9.04
Y al tener Arch, hay unas pequeñas variaciones. Aca un HOW-TO, paso por paso. Se utilizara netcfg.
Configuración inicial y paquetes:
Instalar bluez: pacman -S bluez
-Configurar PAND:
->editamos el archivo:
->nano /etc/conf.d/bluetooth
--> Agregar (ó descomentar y editar) las lineas:
PAND_ENABLE="true"
PAND_OPTIONS="--role PANU"
--> Guardar y salir.
-Nota: En ningun momento inicie el bluetoothd, se inicia solo? Porque no he tenido que iniciarlo, talvez al llamar a pand, hace todo este.
Ahora hay que conectar el iPhone a la PC. Yo use gnome-bluetooth (pacman -S gnome-bluetooth). Y esto hay que hacerlo una vez, las proximas veces se conecta desde el iPhone. El proceso es bastante simple, se le pone agregar dispositivo, te pide una clave, y ya esta (desde la PC este proceso, y la clave en el iPhone). Recordar tener el iPhone con el bluetooth encendido y estar en la pantalla de ajustes (Ajustes -> General -> Bluetooth).
Luego de emparejados, nada más tocar el nombre de la PC en el iPhone, y deberia luego aparece "Conectado".
Configurando la PAN/netcfg:
Primero, obtenemos la dirección fisica del adaptador Bluetooth del iPhone. Vamos a Ajustes -> General -> Información -> Bluetooth. Ahi dice la dirección fisica, la vamos a necesitar más adelante. (otra forma de obtenerla es haciendo un hcitool scan).
Con un simple script para netcfg, configuramos el dispositivo:
nano /etc/network.d/iphone-bluetooth [sino existe, se crea el archivo]
Archivo de configuración para netcfg:
CONNECTION="ethernet"
DESCRIPTION="iPhone Bluetooth"
INTERFACE="bnep0"
IP="static"
PRE_UP="pand --connect 00:26:B0:BB:BA:75 -n; ifconfig bnep0 up" #El parametro despues de --connect, es la dirección fisica del Bluetooth del iPhone
GATEWAY="192.168.20.1"
DNS=("8.8.8.8") #Este es el DNS de Google. Uso este porque es una IP facil de recordar, y no hace falta que sea el del ISP
IFOPTS="192.168.20.3 netmask 255.255.255.0 broadcast 192.168.20.255"
POST_DOWN="pand -k 00:26:B0:BB:BA:75" #Nuevamente, luego de -k, es la direccion fisica del bluetooth. Esta linea es para eliminar la conexion.
Probando la configuración:
Para probar la configuración, nada más tenemos que (luego de Conectar el dispositivo, que lo hacemos desde el iPhone), poner:
netcfg iphone-bluetooth
Para desconectar es, netcfg down iphone-bluetooth. Donde iphone-bluetooth, es el nombre del archivo en /etc/network.d/.
Problemas comunes:
En caso de mal funcionamiento, siempre intentar:
- Eliminar el dispositivo y nuevamente agregarlo (en gnome-bluetooth por ej).
- Reiniciar el servicio de bluetooth (sudo /etc/rc.d/bluetooth restart)
- Reiniciar la PC y/o el iPhone
- Reconectar el adaptador bluetooth de la PC
- Apagar y encender el bluetooth en el iPhone.
HOW-TO PENDRIVE booteable con GRUB – NTFS + ext2
El proposito de esta guia es explicar el proceso para la creacion de un pendrive booteable.
indice
A. Introduccion
B. Creando particiones con fdisk
C. Dando formato a la particion ext2
D. Instalando GRUB
E. Creando menu.lst para GRUB
F. Instalando MemTest86+
G. Dando formato a la particion NTFS
A)
Test case: SuperTalent PICO C 16GB
Explicacion: Teniendo un pendrive de tal magnitud, el sistema de archivos FAT32 tendia a corromperse. El objetivo era crear un pendrive booteable (que era con SYSLINUX @ FAT32) con NTFS.
Problemas encontrados:
-SYSLINUX no corre en NTFS.
-Windows "lee" una sola particion en unidades USB (no permite unidades particionadas).
Solucion pensada: Particionar para tener un sistema NTFS y la vez tener otra particion booteable.
Datos extras encontrados:
-Windows solo "monta" LA PRIMERA particion de un pendrive.
Requerimientos:
-Pendrive
-Linux (Livecd/virtualpc/nativo) con GRUB
-GParted para linux, aunque se puede hacer sin este, que solo lo vamos a usar para dar formato a la particion.
El pendrive perdera toda la informacion, hacer backup antes.
TODO:
-Agregar instalacion de Ubuntu
-Agregar GParted
-Agregar imagenes
B) Creando particiones con fdisk:
Guia:
1) Conectar pendrive al sistema Linux. (En mi caso use Debian).
2) Al conectar en la consola (tty1), aparece algo como lo siguiente:
En mi caso el pendrive es [sdb]. (Nota, se puede encontrar el mismo mensaje usando "dmesg | tail")
3) Ingresamos "fdisk /dev/sdb", donde sdb es el disco que les aparecio. (Tambien lo pueden encontrar en el GParted):
3.1) Ponemos "o" para borrar la tabla de particiones.
3.2) Ponemos "n" para una nueva particion:
3.2.1) "p" para PRIMARIA (primary partition).
3.2.2) "1" para especificar el numero de particion 1. (Esta va a ser la particion NTFS)
3.2.3) First cylinder: (default 1): Le damos enter. (Significa desde el comienzo del disco/ultima particion)
3.2.4) Last cylinder: Aca podemos especificar el numero de cilindro o la cantidad de MB o KB. En mi caso voy a usar cerca de 13GB, pongo: "+13000M"
!!!! Para calcular el tamaño, podemos ir a "fdisk > p" y ahi nos dice: Units = xxxxxx bytes. En mi caso las unidades son de 1MB cada uno. Lo que puedo hacer es, crear primero la particion 2, empezando de TOTAL - 1500 (1.5GB~) y luego la particion 1 con el espacio restante !!!!
!!!! O podemos utilizar el sistema que se utilizo aca, que seria crear la primera particion y usar el resto !!!!
3.3) Repetimos "n" para nueva particion:
3.3.1) "p" para primaria
3.3.2) "2" para el numero de particion 2. (Esta va a ser la particion donde pondremos el boot, en este ejemplo va a ser ext2)
3.3.3) First cylinder: (default xxxx [primer cilindro disponible]): Le damos enter. (Significa desde el comienzo de la ultima particion)
3.3.4) Last cylinder: (default xxxx [ultimo cilindro]): Le damos enter en default asi termina en el fin del disco.
### Hasta ahora creamos una nueva tabla de particiones y creamos las 2 particiones ###
3.4) Procedemos a cambiar los tipos de particiones:[imgR]10[/imgR]
3.4.1) "t" para cambiar el tipo de particion:
3.4.1.1) "1" para cambiar el tipo de particion de la particion 1
3.4.1.2) (con L podemos ver una lista de todos los tipos) en este caso vamos a ponerle el tipo NTFS (HPFS/NTFS), que es el codigo HEX "7"
## La particion 2 no requiere cambio de tipo, ya que por default es 83 (Linux). ##
3.5) Por ultimo, vamos a cambiar el flag de particion de boot:
3.5.1) "a" para cambiar el flag
3.5.1.1) "2" para el numero de particion.
3.6) Verificamos que todo este correcto:
3.6.1) "p" para imprimir tabla de particiones, en mi caso:
3.7) Finalmente, "w" para escribir cambios y salir.
C) ### Dando formato a la particion ext2 ###:
"mkfs.ext2 -v /dev/sdb2"
- Mi unidad era sdb, entonces es sdb2 porque es la particion 2.
D) Instalando GRUB:
[Ahora a montar la particion]:
[Creamos un directorio] mkdir /mnt/usbdisk
[Montamos] mount /dev/sdb2 /mnt/usbdisk
### Copiando archivos "stage" requeridos para grub ###
!! Informacion: Los archivos STAGE estan en el directorio /boot/grub en Debian/Ubuntu, porque estos instalan GRUB, descarga mas abajo !!
[Cambiamos de directorio] cd /boot/grub
[Creamos directorio destino] mkdir /mnt/usbdisk/boot
[Creamos directorio destino] mkdir /mnt/usbdisk/boot/grub
[Copiamos los archivos stage] cp *stage* /mnt/usbdisk/boot/grub
### Instalando grub ###
[Iniciamos el prorgama] grub
@ Definimos la raiz (root): En mi caso era sdb2, en grub la numeracion es (hd0,0),(hd0,1),(hd1,0) [seria hdX,Y; siendo X el numero de disco, Y la particion]: en mi caso: (hd1,1) @
[ Definir raiz: ] root (hd1,1)
@ Obtendremos un mensaje: Filesystem type is ext2fs, partition type 0x83 @
[ Instalamos ] setup (hd1)
@ Va a buscar los archivos stage y dsp va a poner Done @
[ Salimos ] quit
E + F)
### Creando menu.lst ###
!! En este ejemplo vamos a crear un menu.lst con el memtest86+, lo pueden descargar y extraer manualmente clickeando el link abajo !!
[Cambiamos directorio] cd /mnt/usbdisk/boot
[Creamos directorio images para organizar: ] mkdir images
[Cambio direcotrio] cd images/
[Descargando memtest86+ ] wget http://www.memtest.org/download/4.00/memtest86+-4.00.bin.gz
[Extrayendo .gz ] gunzip -d memtest86+-4.00.bin.gz
[Renombramos (opcional) ] mv memtest86+-4.00.bin.gz memtest86
[Vamos al directorio de grub] cd ..
[ ... ] cd grub
[ Creamos un archivo menu.lst ] touch menu.lst
[Procedemos a editar el archivo, en mi caso voy a usar nano] nano menu.lst
-- Contenido del archivo menu.lst --
default 0
timeout 30
color cyan/blue white/blue

#Memtest86
title Memtest86+
root (hd0,1)
kernel /boot/images/memtest86
#/Memtest86
-- Explicacion del archivo:
default: Numero de opcion por defecto
timeout: Tiempo limite para auto-bootear
color: Colores

title: Titulo de la opcion
root: raiz
kernel: imagen a bootear
[Para agregar nuevos, copiar las ultimas 3 lineas]
Ctrl + O = Guardar
Ctrl + X = Salir
### Terminando: ###
[Cambiamos directorio ] cd /
[Desmontamos particion] umount /dev/sdb2
[Expulsamos disco] eject /dev/sdb
G)
### Dando el formato a la particion NTFS ###
En windows:
- Boton derecho a mi pc -> "Administrar"
- Sobre el menu izquierdo: Administrador de discos
- Buscamos la unidad removible, que va a estar particionada en 2:
- Boton derecho a la particion 1 -> Formatear: Ahi seleccionan NTFS, Formato Rapido, Tamaño de asignacion predeterminado -> Formatear.
El pendrive esta listo.
Si falta info, o necesitan algun paso mas detallado, avisen que se agrega. Las imagenes las termino de armar y las agrego.
